|
Build Blog This page last updated 9-25-2016 **** May take some time to load due to many pictures- Please wait***** |
Page 7
Phase 2- Transformation of the car to more of a Drag car
November 9, 2015- Start of Phase 2 transformation
It was a fun season and I hit the track one last time a week ago before they closed for the season. The stang has been consistently in the 11.2 sec. range now that it is hooking pretty good.
So off to the winters projects.
Number one on the list is the transmission. Even though the TK0600 has the carbon fiber lined synchros, about 1 in every 3 shifts going in 4th gear (only) above 6000rpms, it would hit a wall and not shift, so I lowered my shift light to 5800 for the 4th gear shifts to minimize this. I was so so close to swapping in a C4, but I like shifting so much, that I decided to stay with the stick.
So its off to Liberty Transmissions for some work to not only take care of the shifting issue, but to beef it up for some additional engine work underway.
-Faceplate 2nd, 3rd, 4th gears
-Metal treatment including: Cryogenic Processing, Thermal Stabilization, Surface
Enhancement Processing, and Shot Peen
-Liberty's Exclusive Threaded Front Cluster Bearing Support
-Internal Shift Linkage Upgrade
-Bronze Shift Fork Pads
Clutch:
To complement the trans and engine work, Tim Hyatt over at Hyatt Racing Services
is going to build a slipper clutch to match the specs of the car and engine.
The car has become 90% track and 10% street now, where the 10% is mainly testing
work I have done on the car.
Engine:
On the engine side of things, It was pulled this weekend and dissembled to the
short block. I talked to a number of places that are well known for their Z304
head work, s and in the end decided to go with Duane Bush at Bush Racing. The
plan is for some port work, including larger valves to complement the 460CI,
as well as milling to get around 11.0:1 compression.
Also swapping a Vic Super Intake, and Duane will do some port work and clean up to complement the heads.
Lastly, the HYD roller cam is being swapped to a custom solid roller with a more aggressive profile.
Besides all of the head work which includes cleanup, port matching, etc. they will get larger intake and exhaust valves, PAC 1225 springs and PAC TUFF 64 titanium retainers. The heads will also be angle milled to boost the compression getting it close to 11.8:1, but that is still TBD. With all of this, there is a very good chance the pistons will have to be fly-cut for valve clearance.
The goal is to get close to 680HP at the crank, with peak HP around 6500-6700 and shift point at 7000
There are a few other small things, to be done, but these are the biggies.
It shall be an interesting winter when it hits the dyno.
December 12, 2015- Head Work
Initial head work From Duane Busch is showing very good results over the stock
numbers: Flow was done at 28 in Hg on a Superflow 600 flow bench.
After initial cleanup:
Intake Flow
.300 lift 224 cfm
.400 270
.500 314
.600 334
.700 342
.800 345
Stock intake valves with 2.02" flowed around 272 cfm @.500, now they are 2.1" with 314 cfm @.500, and the .600" of 334 is awesome
The solid cam will result in .710 lift
Exhaust Flow
.300 lift 171 cfm
.400 206
.500. 233
.600. 249
.700. 261
.800. 265
Stock exhaust valves with 1.6" flowed around 212 cfm, now they are slightly bigger at 1.625" and flow 233cfm@.500
Ford Stock number right out of the box:
Lift Intake Flow Exhaust Flow
(in) (SCFM) (SCFM)
.050 31.1 26.4
.100 64.6 55.8
.150 103.0 84.6
.200 135.3 113.3
.250 167.0 146.8
.300 199.0 171.6
.350 227.2 190.2
.400 245.2 200.4
.450 259.8 207.2
.500 271.9 212.8
.550 277.3 218.1
The valves are Ferrea Super Flo series. They have a necked down stem improving flow
December 19, 2015- Slipper Clutch
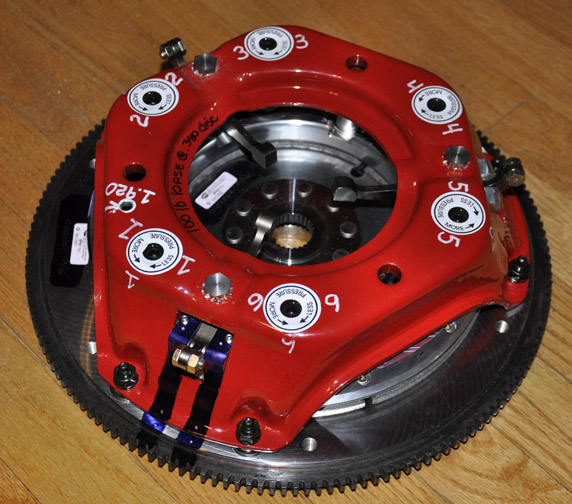
Some of the goodies are arriving for the updated build. Just received the custom built slipper clutch set from Hyatt Racing Services. Tim Hyatt customized this to match the car. He starts off with a McLeod Soft loc pressure plate and modifies it from there, including different springs, and counterweights. Also uses a sintered iron disc to handle the power.
This definitely makes it more of strip car now with more tweaking.
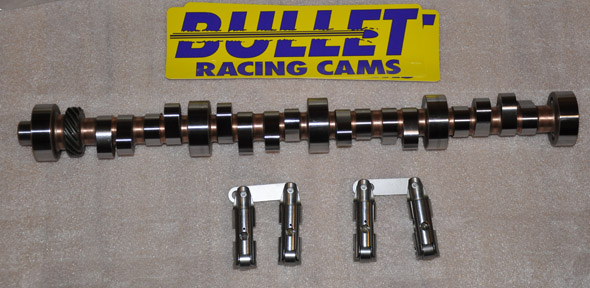
December 20, 2015- Custom Cam
The custom ground cam shaft that is: Its a bit wild with a gross valve lift of .755 intake /.740 exhaust. Duane Busch/Busch Racing who is doing all of my head work worked with Mark at Bullet Cams on a custom grind. Took about 2 weeks from order to delivery. Duration at 0.050 is 261 intake/272 exhaust.
It is a solid roller with Morel 5436 lifters.
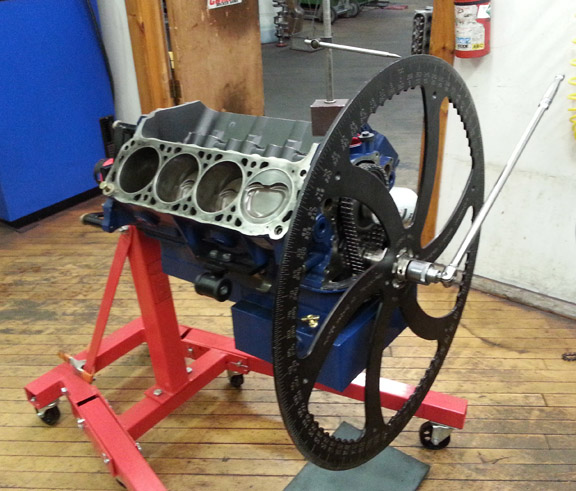
December 29, 2015- Degree Cam
Paul at PK machine degreed the cam for me. Just using the timing gear witness marks as a starting point it was advanced an additional 1.8 degrees from what we want. After some adjustments got it to within 0.5 degrees. Also confirmed that the cam was ground properly and there was sufficient end play. The Ford Racing B302 timing set has a number of key-ways to make adjustments relatively easy.
Going to be a bit before I can do much more since the heads are not done yet. Hopefully only 3 more weeks for those. In the mean time I decided to remove the power steering so swapping out the linkage is next on the list.
The degree wheel we used was like a 3' wide wagon wheel that really helped setting this up
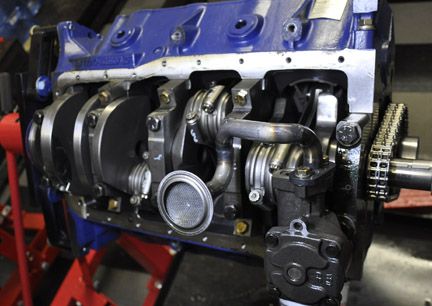
December 31, 2015- Check Clearaces
Wanted to make sure there was sufficient clearance with the new cam. Checked the clearance between the cam and other components (such as rod to cam) and there is lots (as in greater than 1/2") of clearance. The Rods are SCAT forged steel H-beam 6.125-inch length.
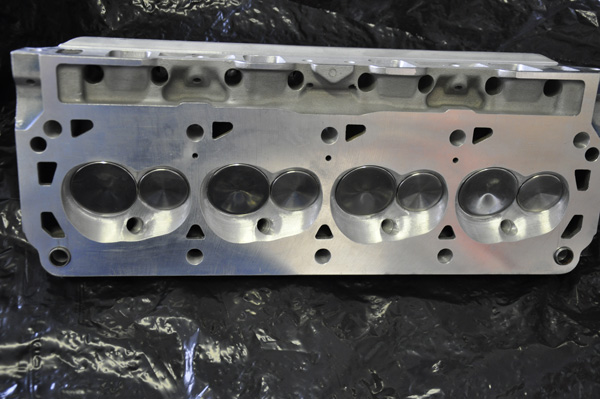
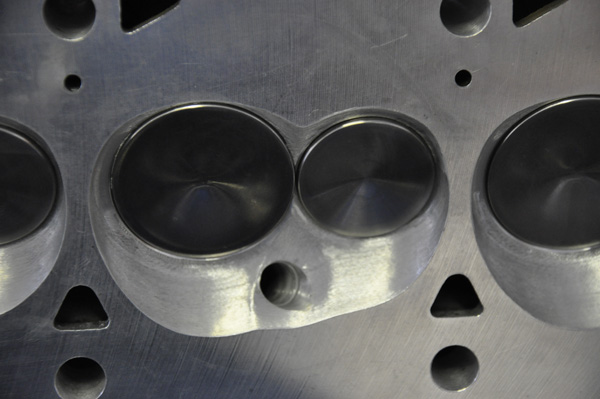
Feb 1, 2016- Heads
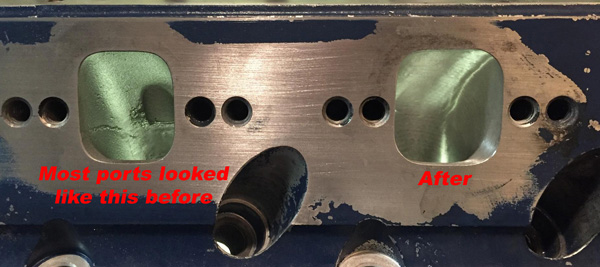
The worked Z304 heads arrived and look amazing. The flow numbers above were consistent across all ports, so they really cleaned up nicely.
In summary:
Increased intake valves from 2.02" to 2.10, and exhaust from 1.6 to 1.625"
with Ferrea comp plus valves. Those are the max the heads can support.
Went with PAC 1225 drag race springs, topped off with Titanium retainers.
To boost compression to just under 11:1, the heads were angle milled 1* (0"
to .120") reducing the chamber size from 63cc to 54cc. Going with the larger
valves did require opening the pockets up some, so we increased about 2cc from
52cc.
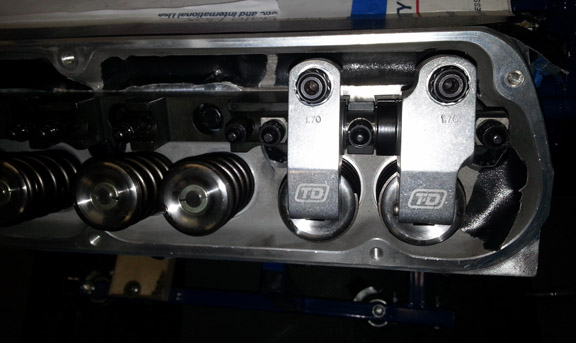
The heads had Ford Racing stud rockers, but those are being swapped to Shaft rockers to to improve the geometry, better lash control with the solid cam and improved valve train stability. One major driver for these is the pushrods will be about 8.5", which is long. T&D Machine is making the shaft rockers now and hopefully have them in a week.
The Z304 heads require offset rockers, and the only off the shelf ones are 1.65:1 ratio. TD can do any ratio, so the head person (Duane Busch) and Bullit cams recommended going with 1.70:1 to take even better advantage of the head flow. That increases the gross valve lift to: .755 intake and .740 exhaust. Also jumping up to 3/8" pushrods.
A very rough Piston to Valve clearance check seems fine, but I need to wait for the shaft rockers for the final measurements and see if any clearancing will be needed.
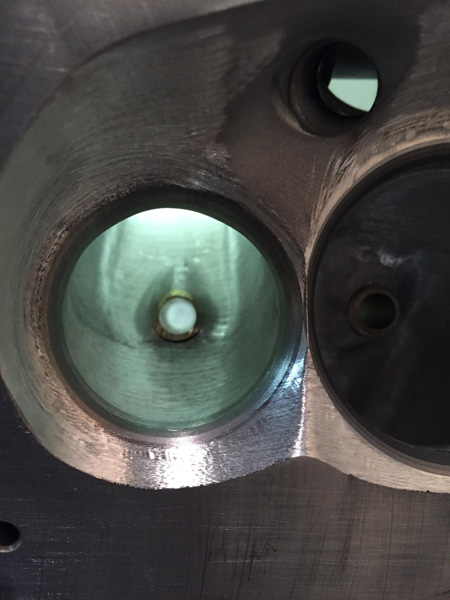
The as cast runners in the Z304 heads were not that great, so there was a good amount of polishing, then port matching to the headers, as well as to the intake. The Vic Jr intake I had would not support the flow, so that was swapped out for a Vic Super that has also had a good amount of cleanup on the runners.
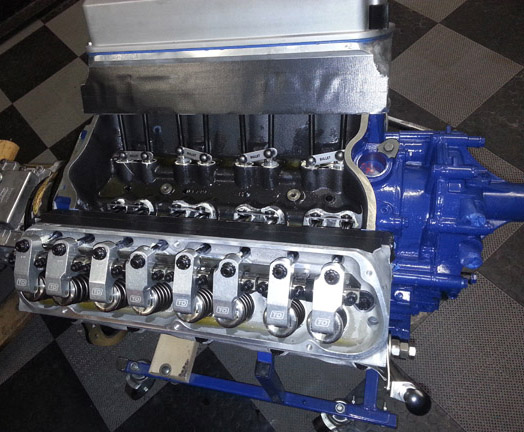
Feb 15, 2016- Engine
Engine is slowly coming together. I received the shaft rockers from T&D machine last week and was able to do my final Piston to valve clearance measurements. From early on I was hoping the current valve pockets would be sufficient and I would not have to fly cut the pistons given the new cam has .755/.740 gross valve lift and the heads were angle milled to boost compression.
I was overly cautious and checked P2V on every cylinder in every way including with clay, as well as dial indicator during the overlap period, and even P2V at TDC (basically seen how far the valve would drop when piston was at TDC). Minimal numbers were: Intake- 0.101" radial clearance, 0.163 depth: Exhaust 0.102" radial, and 0.158" depth, Fortunately Ford spec'ed the pistons with Mahle to take bigger valves and more lift with plenty of margin.
These shaft rockers look great and are very well made.
The rocker stands is bolted to the head and then the pairs of shaft rockers are installed.
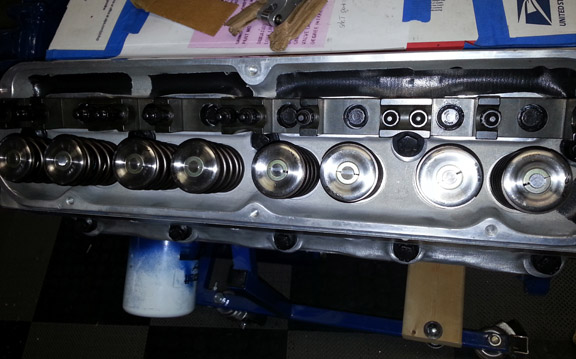
Feb 27, 2016- Engine
Playing a bit of catch up on here since things have been moving along and everything is finally coming together. All of the engine parts are installed, and the fully worked over faceplated TKO 600 transmission from Liberty Gears also arrived.
The pushrods are from Smith Brothers, and given the lift and the spring pressure, I went with a one piece 3/8" x.120" wall thickness part. The extra thickness provides more stiffness given the Z heads with this combo resulting in an 8.5" long rod. The slightly more weight is not a big issue on this side of the rocker.

The rods have a 210 degree ball on the rocker end for additional clearance. With the cam having a lob lift of .4440/.4353 and with the 1.7 ratio rockers, the gross valve lift is .755/.740 so that rocker is really tipped.
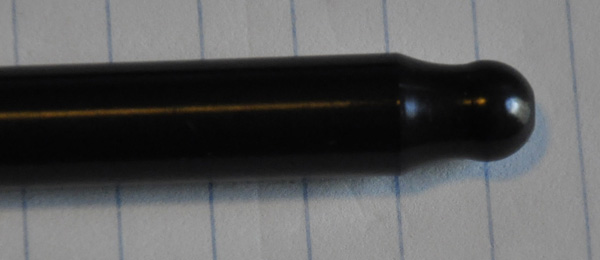
The cam is a solid roller and those Bullet lifters are actually Morel 5436 lifters.
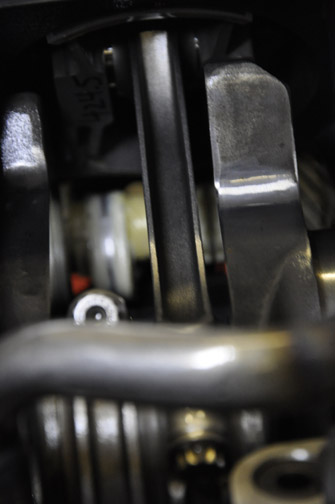
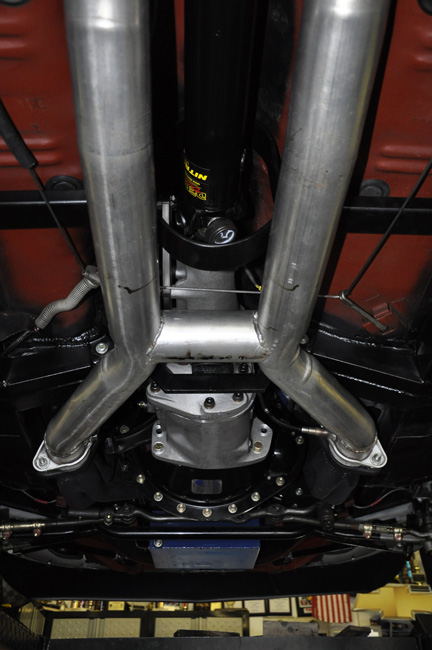
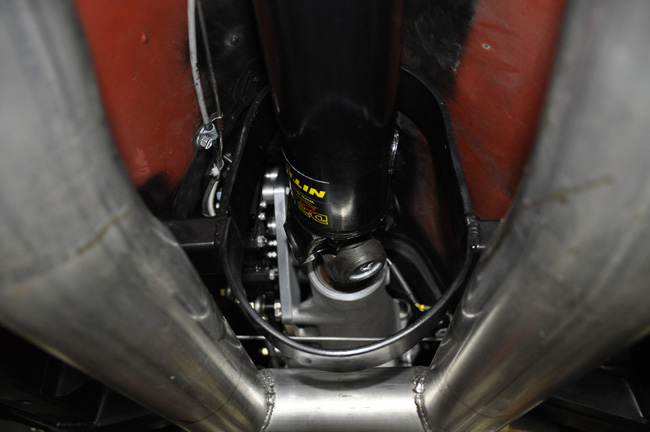
Earlier in this thread you will see me complaining at times about my hydraulic clutch. It was 100% good on the street, but at the strip it was a problem between fluid heating up and maintaining a good air gap. Well, since I went down the path of the slipper clutch, I decided to go to a mechanical linkage setup with a Z-bar. What a total PITA that was. Between the headers and the SFI scatter shield there was limited space. Fortunately, I started the mock-up before the heads were on the block so I could easily work in the engine bay and then stick the heads on and the headers. Note that before I pulled the engine at the start of this updated build, I carefully measured the block angle and position, so I could position it the same for this mock up.
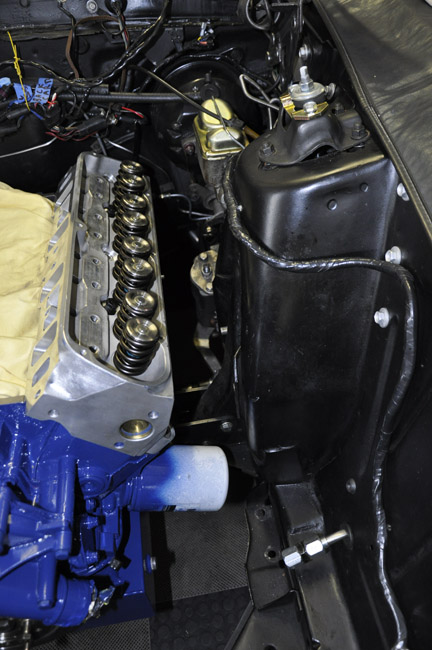
Then complete the fitment outside of the car. I will also further reinforce the Zbar at that time.
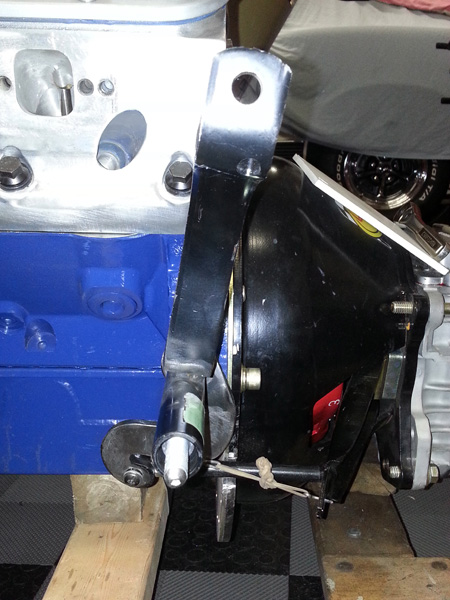
As you will see in the last picture below, I had to modify my headers in order to make this work and get the needed clearance. Boy, the hydraulic clutch was so easy to install compared to this
There will still be some final tweaking when I get the engine and trans installed, but so far all looks good with decent clearance. The torque strap that I installed last year is a definite must now!
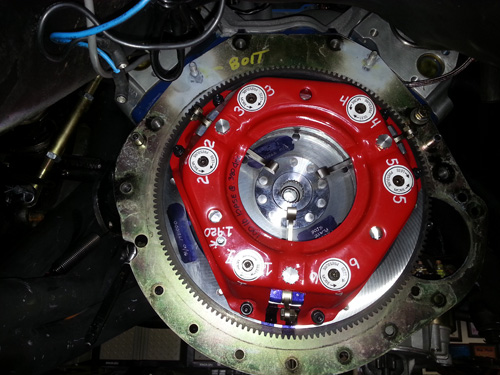
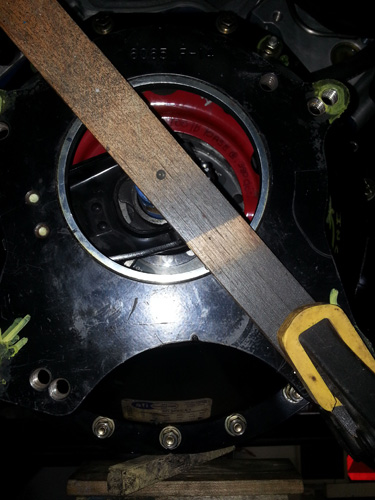
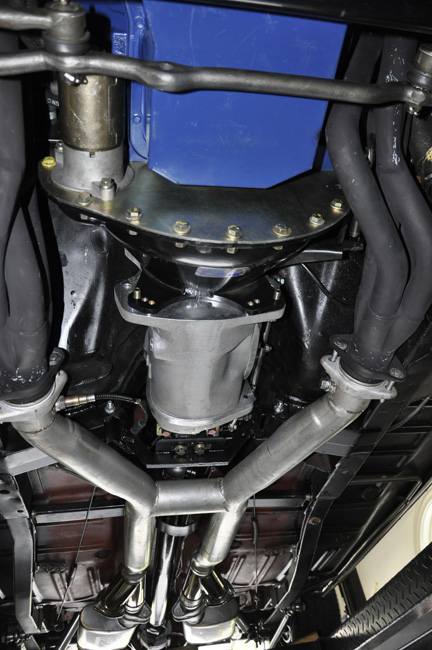
Moving on to the slipper clutch. This clutch as the ability to adjust the base pressure for slippage and then as RPM's increase, counterweights increase the pressure. The base pressure can be adjusted to tune everything everything together. The 6 adjustment points are on the pressure plate need to be turned with an Allen wrench to add/remove pressure.
To gain access without removing the transmission every time, an access hole needs to be made in the scatter shield. Yes I realize that that voids the SFI re-certification, but there really is no way around it without yanking the transmission all the time. At the track, the tech inspectors never crawl under the car, and it is hard to see tucked way up.

Inside view
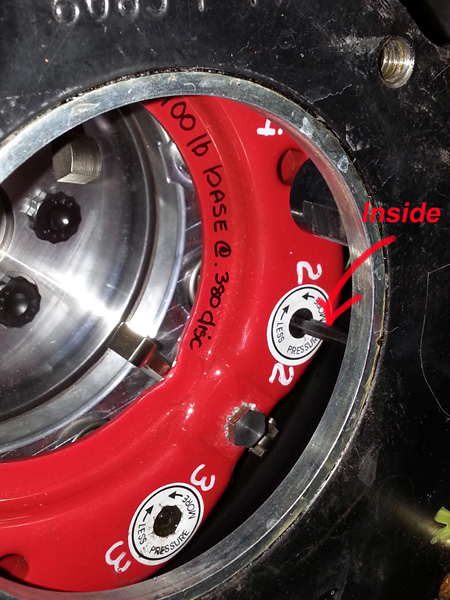
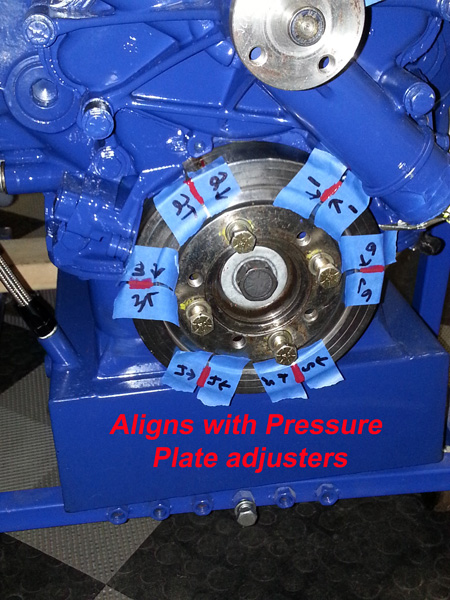
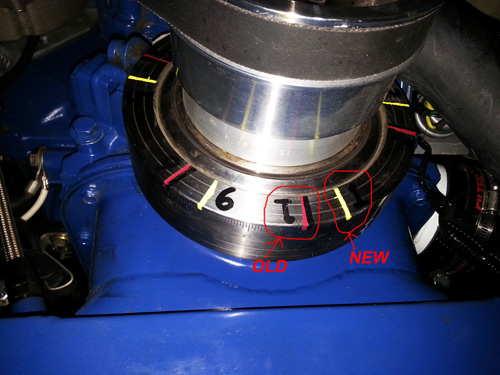
To make aligning the adjustment points with the hole, I marked the damper, so each time one of the marks align with the timing pointer, another adjustment is aligned.
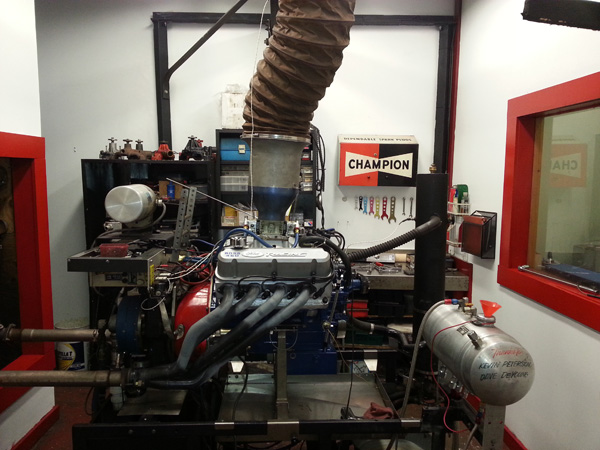
And now, ready for the dyno! Hopefully I will be able to get it scheduled within the next 2 weeks
March 5, 2016- Dyno Runs
Summary of dyno results: (overall 20+ pulls including additional repeat ones to verify consistency). Dyno was a Superflow SF-109
1. Very first pull was 631HP @6400 and 565 LB-ft @ 5500
30 deg timing, jets 83 primary, 91 secondary
2. After additional runs with some adjustments 658HP @6800 and 574 LB-ft @
5600
Included increasing the air bleeds from .042" to .051", timing to
28 deg (range checked was 33 to 26 deg), and jet changes ending at 86 primary,
95 secondary
3. Spacer change-656HP @6700 and 577 LB-ft @ 5400
Earlier pulls were done with a standard 1/4" insulating open spacer. Now
installed a 1" HVH tapered combo spacer (Super Sucker)
The real key here is that even though it did not increase the peak values, it smoothed out the overall curve as well as increasing the HP slightly, and the TQ on average increased 10 lb-ft over 4000 to 5400. So better low end performance with minimal impact on 5400 and above.
4. A number of runs continued to smooth out and raise the overall curve above
and below the peaks with minimal impact on the peaks, getting to the final results:
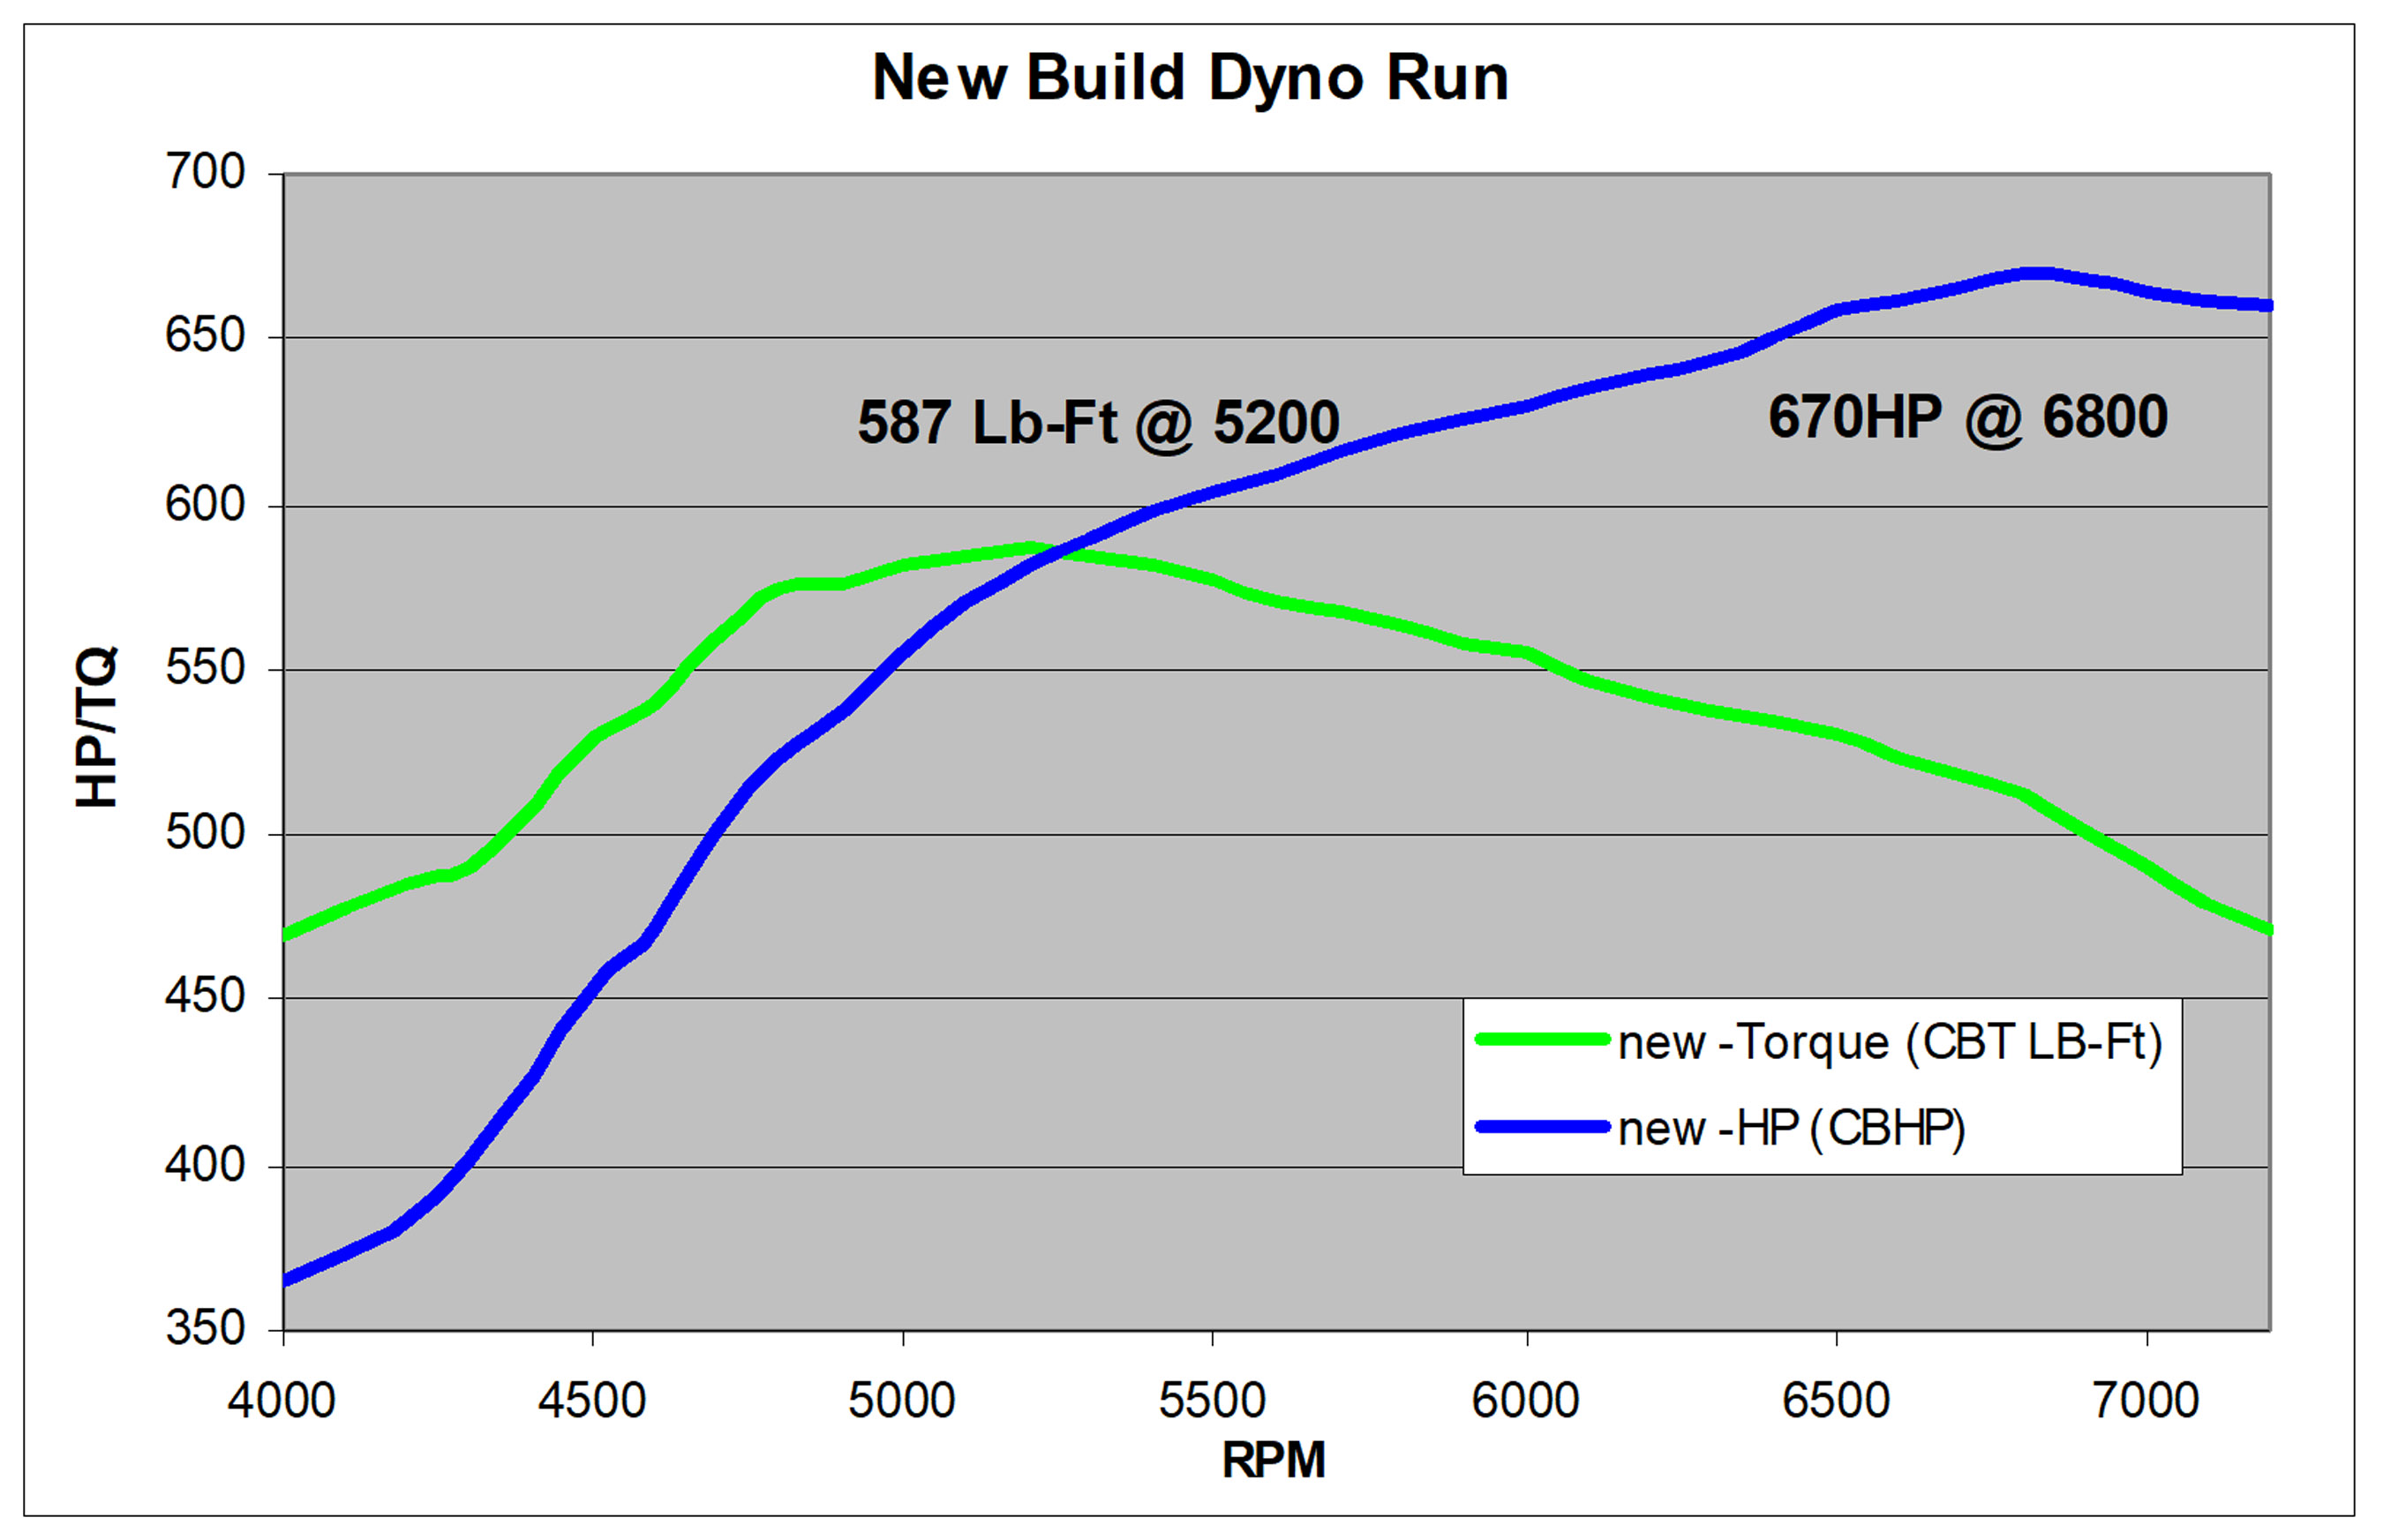
670HP @6800 and 587 LB-ft @ 5200
Locked the distributor with no centrifugal advance. The MSD distributor does
not have a vac advance, and has the ability to lock out the centrifugal advance
so it is fixed over the entire RPM range. It was locked at 28 deg timing, jets
86 primary, 94 secondary, air bleeds .051"
Final results-Open Headers
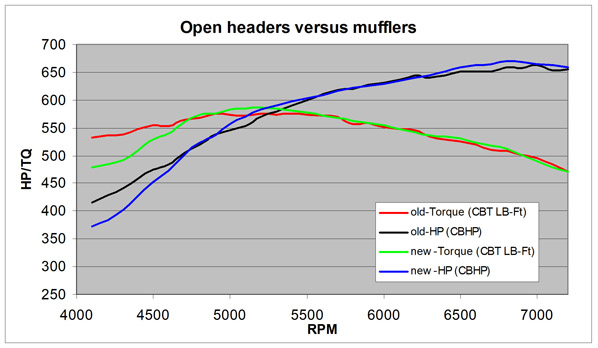
Comparing the dyno results from 2 years ago old heads, cam, and intake, to
show exactly what all of the recent modifications did. Blue/Green new HP and
TQ, Black/Red older HP/TQ.
Before 550hp at 5500rpm and 561 lb-ft at 4400
Now 670hp at 6800rpm and 587 lb-ft at 5200

Also did a pull to see the impact of mufflers (same type as on the car). You can see how the 3" mufflers improved the lower end torque by as much as 40 lb-ft over just open headers, but it did pull the HP down slightly at the high end. Given that launches and shifting at the strip will be well over 4500 there is little impact with the open exhaust, however, on the street with mufflers, the increased torque will help.
Latest Dyno Run Video From March 3, 2016
(Dyno work/Tuning at PK Machine, Fitchburg, MA)
March 31, 2016- Engine in car
The engine has been in the car for a few weeks now and have been working out a few minor things. So far things are going well.
I decided initially to install my Centerforce DFX clutch rather than the custom slipper clutch so I can drive it easier on the street and have one less variable to deal with, especially with the transmission now being faceplated.
Been taking it easy, but the transmission shifts 1000% better. On the street I can either double clutch it for nice easy driving, or if I want to be more aggressive, just put it into gear with no banging at all. Being faceplated it has to be shifted differently with no synchros.
Even with the wild cam and low vacuum, having the vacuum reservoir can keeps the power brakes working good nicely.
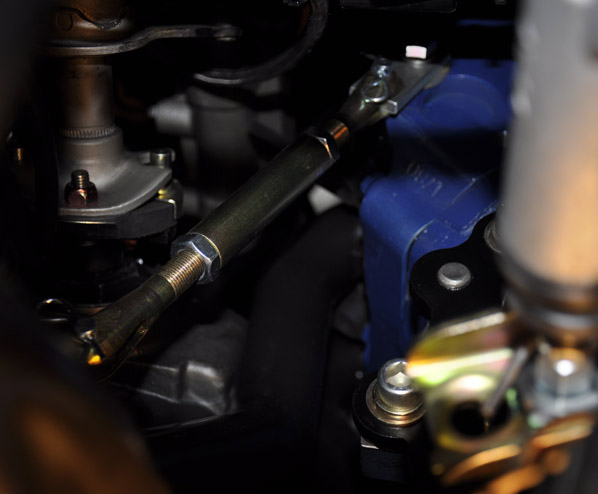
Other things besides all of the engine and trans work included removing the power steering, along with adding a serpentine belt system, and with the custom Z-bar setup, using spherical rod ends on fully adjustable linkage rods so I can dial the clutch in.
Here is a short vid in the driveway. Enjoy!
June 6, 2016- Install Slipper Clutch
I have well over 400 miles on the new engine build and everything is running well. Went through and checked everything including lash and everything is right on.
I have the shifting with the faceplated transmission down pretty well on the street and it is so MUCH easier to shift. Its a blast to drive but I have not been able to really get into it since the street tires just break loose in all gears.
Also I am glad that I swapped to the mechanical clutch linkage from the hydraulic since it was so much easier to set the release point and air gap and pedal effort is still not bad with the street clutch.
Time to swap out the street clutch for my race clutch. I just installed the custom slipper clutch that Hyatt Racing Services built for me late last year.
I have only driven it in on my street with the slipper just a little to make sure the basics are working. We have a local nostalgia heads up race event in a few weeks at a local airport, so that will be my first test before taking it to New England dragway for the real test.
As a reference, this is the sintered steel disc that is about 3/8" thick.
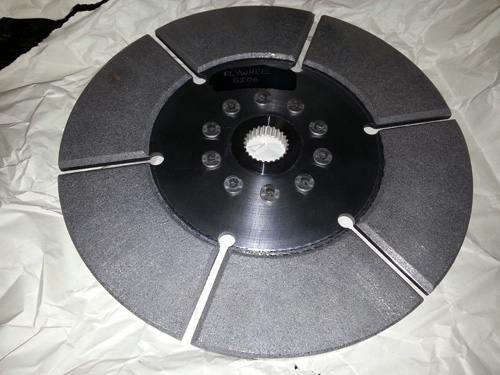
With the adjustable base on the pressure plate, even with it set to 880 lbs static right now to help it set in for the first few passes, I can still push the clutch in with just 2 fingers, so I can only imagine how easy it will be when I adjust it lower as needed.
The fun shall begin :)
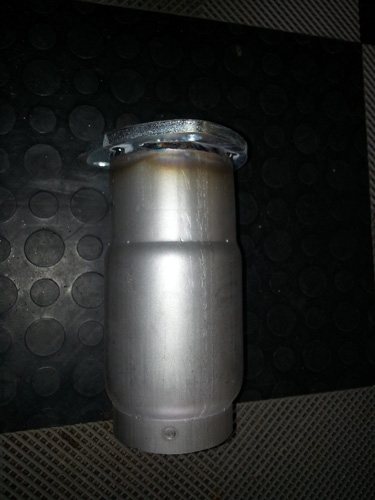
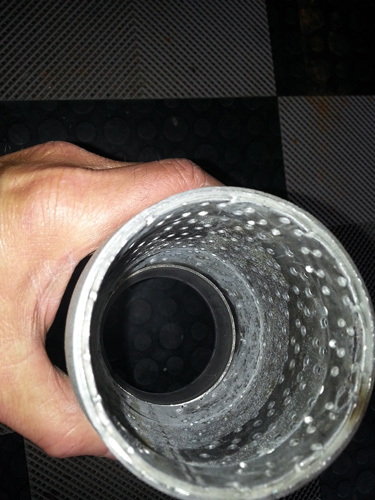
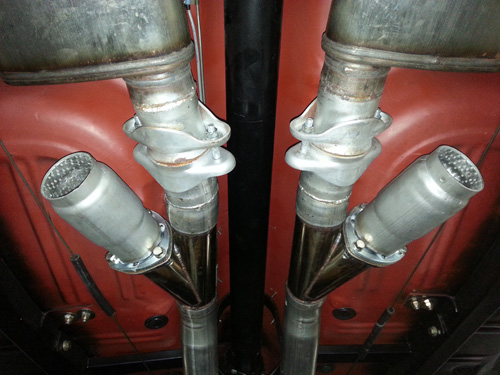
June 11, 2016- Track Compliant Mufflers
The local track requires mufflers on weeknight races and streetnights, however, just about anything counts. For example, if you have a turbo, that is considered a muffler. So I could basically run open exhaust, I installed some Dynomax Mini Race Bullet Mufflers which are basically just a 6" length of pipe that you can see right through. Before ordering them I verified that they will pass and yup, they do. :grin2:
I welded a flange so they will easily bolt onto the cutouts.
June 22, 2016- Nostalgic Drag Races- Sterling Airport
This past weekend went to a nostalgic drag race at Sterling airport, here in Massachusetts. They closed it down and made a 330' track, with a 600' shutdown. Barely hit 2nd gear and then had to start to slow down. This was the first time I was able to really get into the car. It was an unprepped surface, so hooking up was a challenge, but it gave me an opportunity to test out the new combination and I was happy. The data logger showed it was hitting 79-84MPH in 330 feet.
I made 6 passes, with the car doing better every time, between lowering the launch RPM, and lower tire pressure, as well as adding another 5 gal of fuel for my last pass for added ballast. Here is a video of the first 3 passes and if you listen carefully you can hear me peddling a bit to stay hooked. Enjoy!
Later this week I will hit New England Dragway for the "real 1/4 mile" test.
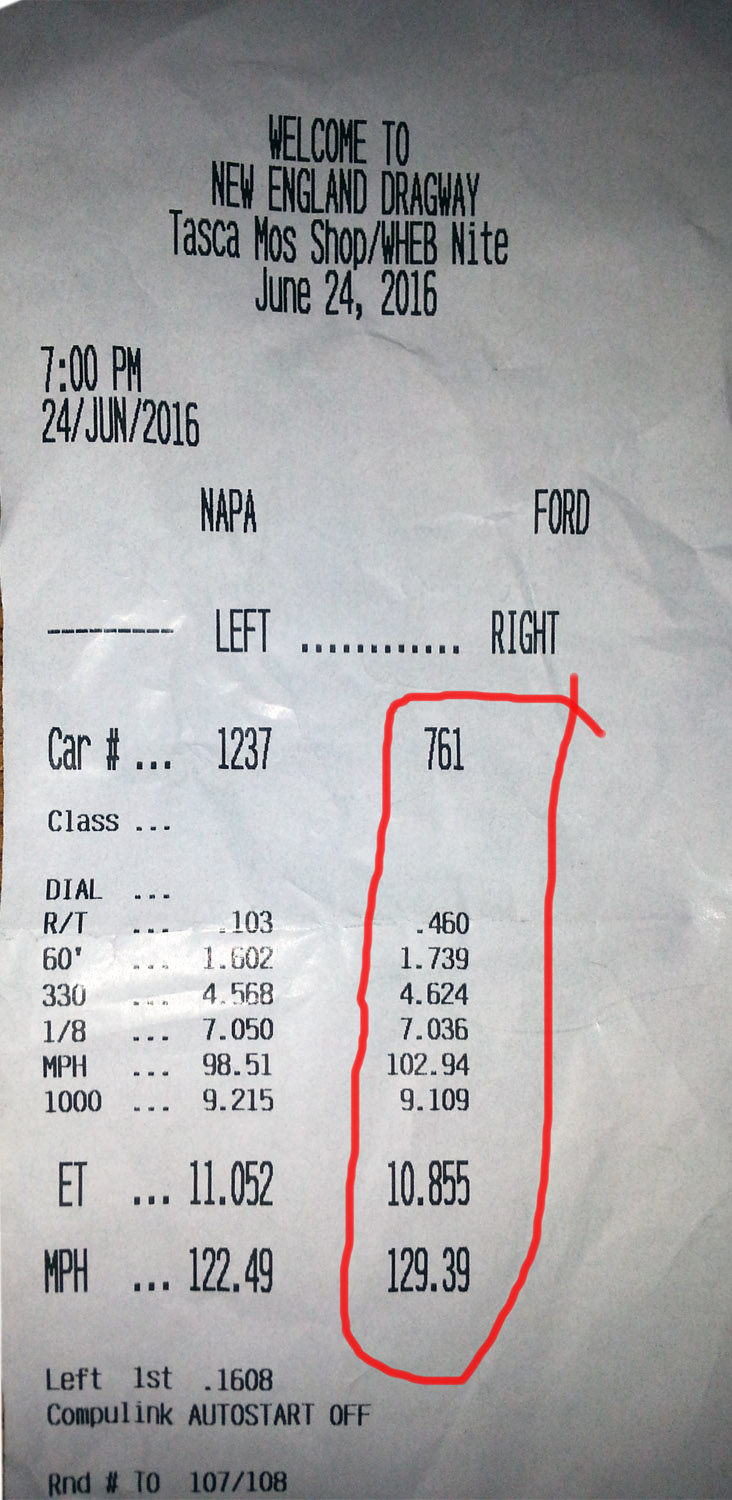
June 26, 2016- First real test with new combo at New Engalnd Dragway
riday night I hit the "real Track" :) and went to New England Dragway.
It was street night, so all types of cars were there. The car went okay, but
it should do much better. Passes were consistent around 10.8sec and ranging
between 127-129MPH, even with my sucky 60' times always around 1.7, so there
is definitely room for improvement. The car launched straight every time, but
my launches were not good.
A bit of a dead hook and a bog off the launch killed the 60's, so I need to work on adjusting the slipper clutch, shocks, and air pressure to begin with.
Getting some great feedback over at the UMTR (United Manual Transmissions Racers) forum
My initial thoughts at this point are:
1. Tires need to slip a bit more off the line since I really did not see them
spin 2-3 times (see slow motion video)
2. Lower the clutch base 1 turn on the clutch (would drop it from 750lbs to
620lbs)
3. Looks like the car jumped up slightly on the launch, so do something (not
sure), with the rear shocks.
----------------------------
Here is the setup that gave the best results:
* Caltracks Preload 1/2 turn both sides
* Tire pressure 12.5psi
* Front Viking shocks: Rebound = 4, Compression =12
* Rear Viking shocks: Rebound = 12, Compression =4
Note the shocks definitely tied the front down, where as last year with the
older build, launch and 2nd, front tires would see air. They also got rid of
the front proposing on gear changes.
* Launch RPM=5500 (going higher times increased to 11's)
* Shift around 6700
* Weight with me = 3575lbs
* HRS (Hyatt racing services) Slipper now set to 5 Turns = 750lbs, and 8.5 grams
(when built they used my engine/trans/car specs)
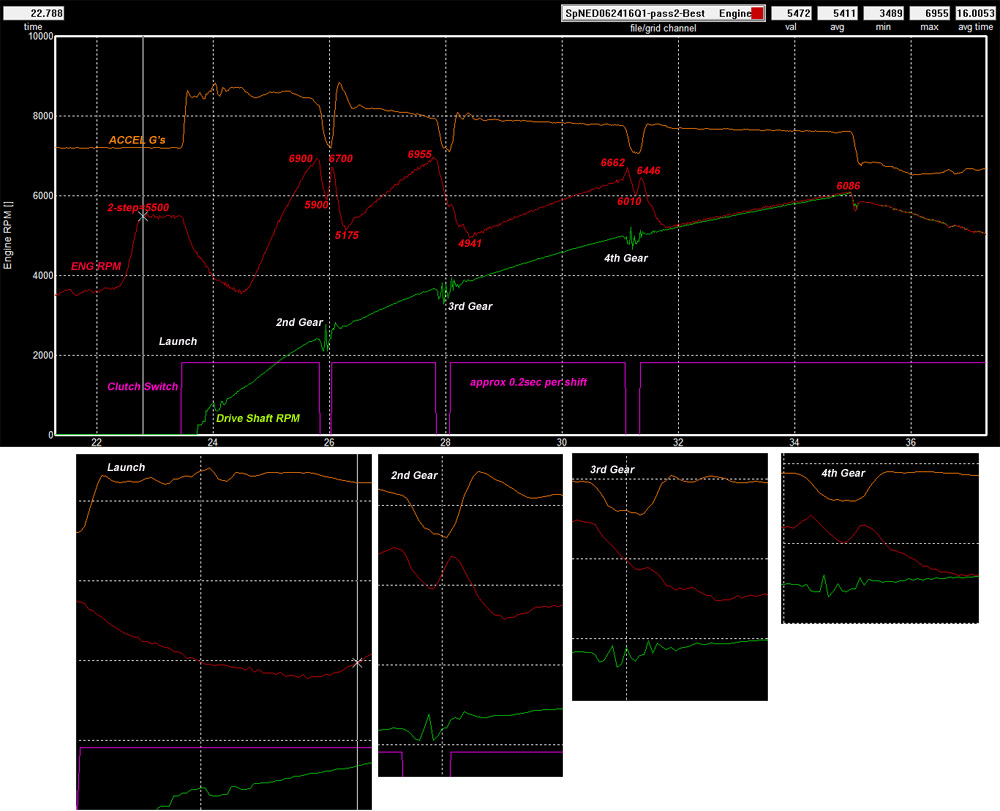
Here is a video. As long as the driver did not mess up, most passes were similar
:)
Racepack run. This shows the RPMs being pulled down.
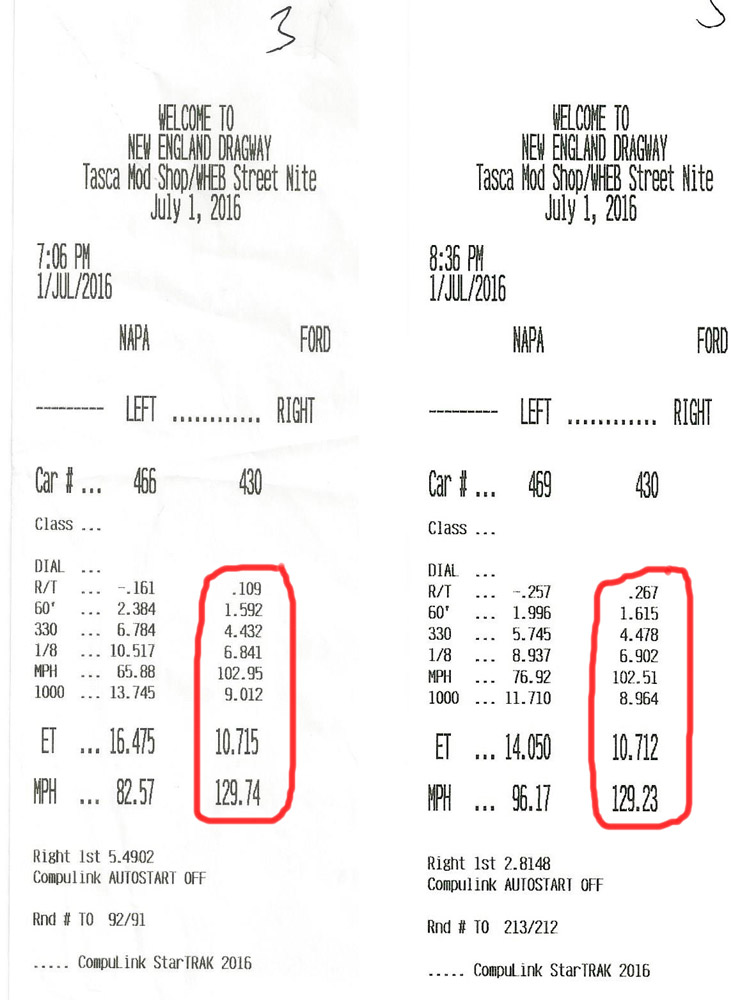
July 3, 2016- Back at New Engalnd Dragway
Made it to the track Friday and was able to get in 5 passes
before it started to rain. I was hoping to try a few more adjustments but the
rain stopped that. Things are slowly improving over last week.
All runs were between 10.712 and 10.945 (most closer to 10.7) with Mphs 129.23
to 129.74, and 60's 1.59 between 1.662, with one 1.705 when the tires unloaded
during shifts
This week versus last week:
60'= 1.59 best versus 1.739
ET= 10.712sec versus 10.855
MPH= 129.74MPH versus 129.39
Changes made for all runs were:
Reduce clutch base 1/2 turn to 4 1/2 turns so approximately, 685 lbs base
Tire pressure up 2lbs, to 14lbs
Increased front and rear shock extension 2 clicks to start
Shift point at 7000 versus 6800
Everything else was the same as last week.
Then on subsequent runs:
Increased Front compression 1 click since the car broke loose on 1-2 shift and
then again on 2-3 shift because of front coming down
Decreased rear rebound 1 click
Increased launch from 5500 to 5700 (gave the best 60' time)
The bog on launch and gear shifts was much less: launch was only 400Rpms versus the 1500 last week.
My brain is still not connected to my right foot. I made a conscious effort to keep it planted during shifts but it still wanted to come up.. LOL
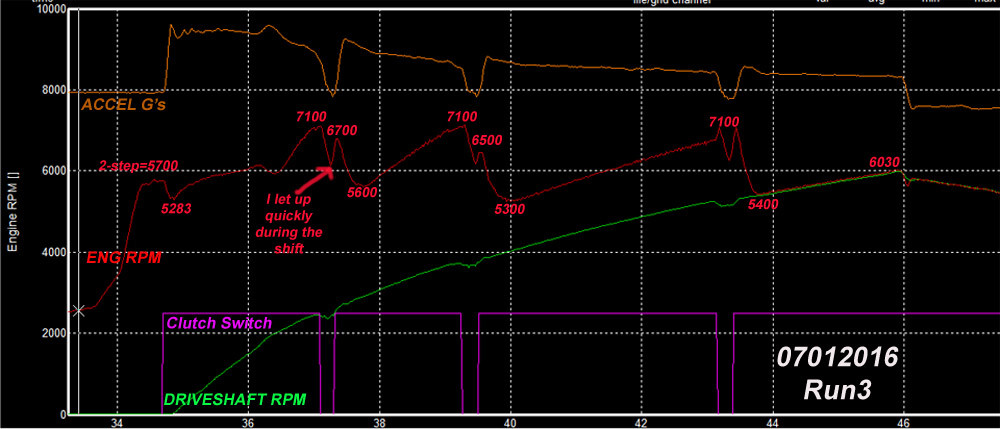
I did not have anyone to take vids of the car going down the track, so here is a quick inside video of the best pass.
The tires seemed to break loose on the 1-2 and 2-3 shifts, so the next thing I am going to try is increase the front compression 1 click to keep in from unloading the rear tires.
As a side note, I noticed that my fuel regulator was cycling keeping the pressure between 5.34psi and 6.24psi. I may bring it up .25psi since AED recommended 5.5 to 7psi.
Given the 129mph, I should get closer to 10.3sec. It is nice seeing the run to run consistency though.
I also plan to increased launch RPMs a little as well as shift points another 100rpms.
Trial and error with small improvements along the way, so I hope :)
July 18, 2016- Track Compliant Mufflers
Went to the track Friday night and it started off good with 6 passes, with the 3 best at 10.63(best run ever) to 10.75 all around 129mph. Best 60's were 1.54, 1.56, and 1.63. That was the good news.
Now for the very bad news. That 1.54 60' pass was also my slowest time and MPH. Hit 3rd gear and looking at the data logger, about .2 sec later, it sounded like bolts rattling around, and then popped out of gear. Yanked the trans out and many bits of teeth all over. Looks like the pieces that broke got between some other gears and mangled them as well.
The added HP pushed the TKO over the edge even with all of the strengthening done. It was fun while it lasted. Now I need to decide what to do with a new trans. I know that I was pushing this TKO even though it had all of that Liberty work done and I am not going to put any $$$ into fixing it. Since it is just a few gears messed up, and everything else, such as sliders, linkage, etc. all seem fine, I will probably try and sell it as a core for someone to rebuild. And yes a manual is still planned and am looking at some "real" drag race transmissions that will take the beating and trying to decide what path to go.
July 21, 2016- GForce G101a Transmission
Been talking with companies, reading various forums, reviewing all of my options within a reasonable price range, and the Gforce G101A seems to fit the bill. It is a clutch assisted manual, where I only need to use the clutch for launching, then 1-2, 2-3, 3-4 just pull it into gear. For completeness I even looked at going to an auto, and from a price point, it was a wash for high end stuff, but the stick still won since that is what I really wanted.
GF is out 3-4 weeks on new builds, so put down a deposit in to get in line. The tech guy is on vacation this week, and I will talk with him Monday on the remaining tech details, gears, etc. The issue is I need to change a few things to use this trans, such as the scatter-shield (different bolt pattern), and drive shaft since this trans is shorter, to name a few. Before I blew the trans, I was going to change my rear gears, but that is on hold now.
August 3, 2016- GForce G101a Transmission Mockup-part 1
The order for a new Gforce G101a transmission was placed a week ago and now waiting on the delivery which will probably be 3 more weeks. Since this transmission is a different size than the TKO600, Gforce was GREAT shipped me an empty case so I could do any fabbing/mods needed in advance.
![]()
Things impacted from the different case size were:
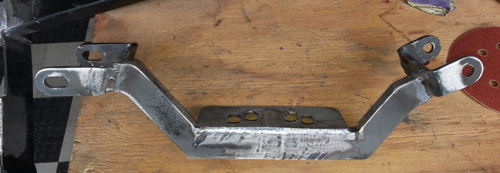
1. Transmission cross brace needed to be modified to work with the new mounting
location and mount type. As it turns out the cross brace bar was directly under
the mount bolts, so I had to slide the slide the cross brace back, and flip
the horizontal mount plate from the back to the front.
This is with the TKO before the brace is modified:
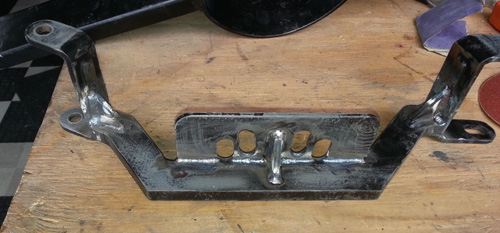
Here you can see the mount plate flipped held by the clamps and the cross bar
is moved rearward. Nothing has been tack welded yet.
These modifications will allow me to use the same bracket if I ever decide
to stick the TKO back in. This mount is stronger and has much more clearance
than the stock one, so I should be okay with linkage clearance where as the
G101a has external linkage- At least I hope so. There is also another plate
that goes under the horizontal plate for additional reinforcement that the mount
bolts will go through acting as a washer.
2. The Gforce G101a is a good 2" shorter than the TKO, so I had to move
my driveshaft loop forward, since NHRA rules state it must be no more than 6"
from universal centerline. I had it right at the 6" so I could remove the
TKO without removing the loop. Now it was too far back, so I had to modify my
mounting points. Just one of those little things that take time. I have only
had my loop even looked at 2 times in the past 3 years by tech inspectors, so
it was unlikely this would be caught, but rather not chance it.
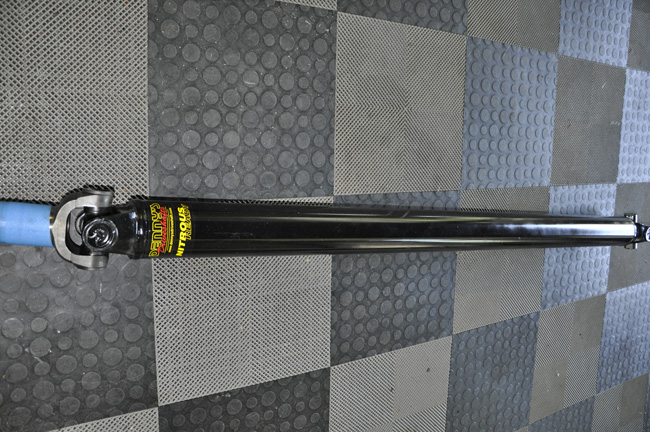
3. The shorter transmission, plus a different tail shaft required a new driveshaft. Having the empty case allowed me to do the mock-up and measure for the new driveshaft. I was very happy with my Dennys Driveshaft (chrome moly) that they built a few years ago, so I ordered this one from them. They are also out 3 weeks, so this should align with the new trans arriving.
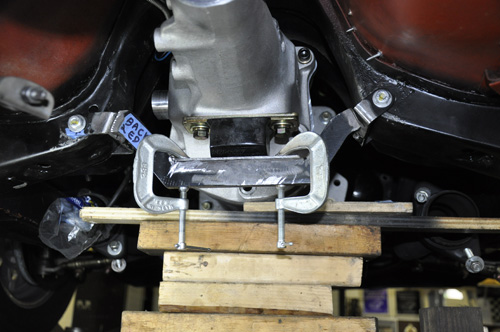
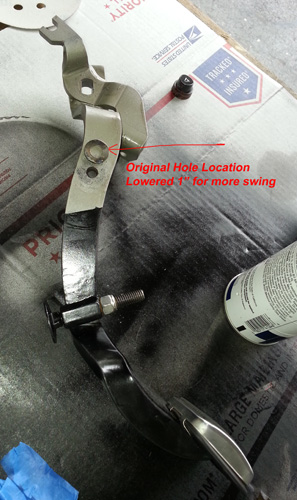
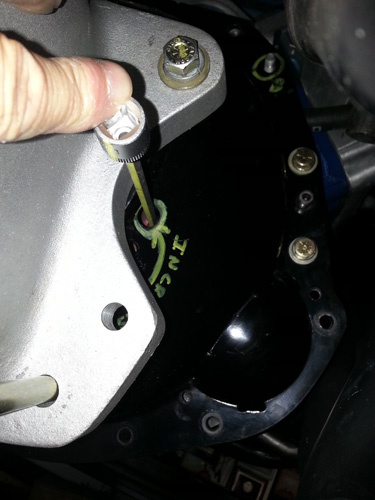
4. With everything taken apart I wanted to work on improving the clutch geometry. With the slipper clutch, the recommended TOB clearance to fingers (pedal up) min .25", optimum .375" and also have the air gap between flywheel/disc (release) at 0.075". With adjusting the linkage I was only able to get just about 0.25 clearance (so at the minimum), and 0.070 gap at one end or .3" with .050" gap at the other end. To increase travel, I lowered the clutch pedal upper rod mounting point which should give the upper rod about 0.6" more travel and with the Z-bar ratio move the fork about 0.2" more and by the time that gets to the TOB, something even less. Some of the additional travel was limited to the lower portion of the Z-bar hitting the headers, so the lower Z-bar tab was modified for additional clearance (forgot to take a pic)
The washer shows where the original hole was located.
I built a jig using an input shaft to more easily measure the TOB airgap and
see if my mods did help. This let me adjust all of the linkage while my wife
pushed the clutch so I could optimize the travel. The input shaft/TOB retainer
sleeve is pinned to that cross board and centered in the scattershield bore.
I could then use dial calipers to accurately measure the TOB gap to the fingers
as I adjusted the Disc/flywheel gap. I did this before the linkage mods were
done as a baseline.
It appears that I now have .065" air gap, with 0.34" TOB/fingers gap.
If I increase the airgap to 0.075" the TOB/Fingers gap drops to .28, so
definitely have more margin than before. I will remeasure once the trans is
installed.
The G101a case is larger where it bolts to the scattershield and it now blocks the clutch adjustment, so another hole had to be made 1" higher. The original one is behind the trans front face.
and with the "domino effect" my damper alignment marks used to align
the clutch adjusters with the scattershield hole, based upon the timing pointer
had to be redone. Old ones have since been removed.
Now just waiting for the goodies to arrive and hoping to be back at the track the end of the month :)
Over the winter the rear end will be upgraded.
September 23, 2016- GForce G101a Transmission Mockup-part 2 and Final Install
It took a bit longer to get the G101a installed, but it is finally in. Ended up being a bit more work to install due to the large shifter and the linkage hitting the tunnel on the left side.
Working with Gforce (mostly interacted with Paul and Bubba) was very good and
those guys were helpful. The transmission looks great and very well built.
![]()
![]()

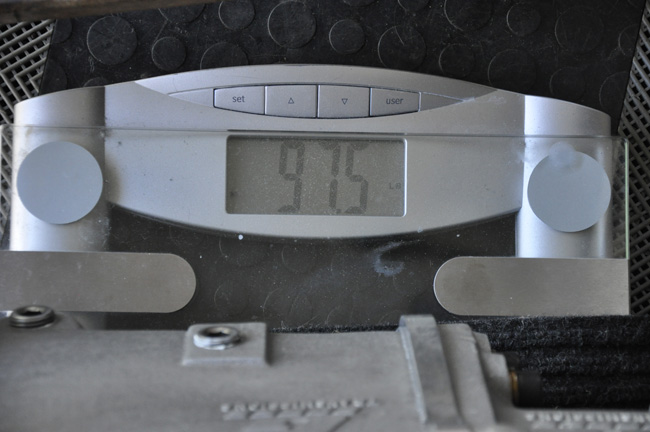
and is much lighter than the TKO600
[IMG]http://www.palmiericoncepts.com/My-Mustangs/1970build/post34/weight.jpg[/IMG]
The new Dennys driveshaft also arived.
I have a Racepak unit, so I had Gforce mill the case to put a clutch slip sensor
on the trans. Gforce does not modify the candle stick, but rather taps the case
to put a Cummings proximity sensor that counts the teeth on the input shaft,
so no magnets are needed.
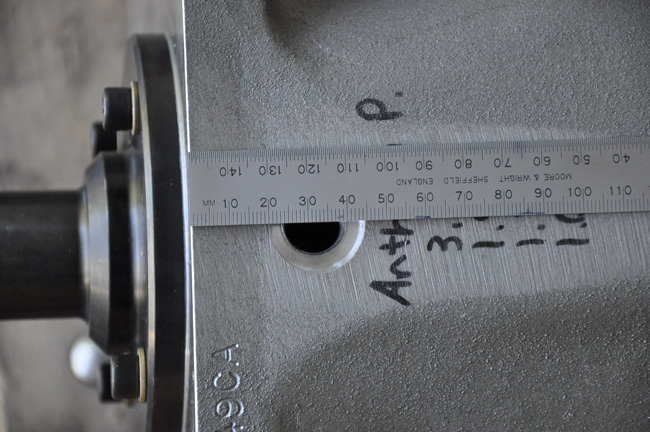
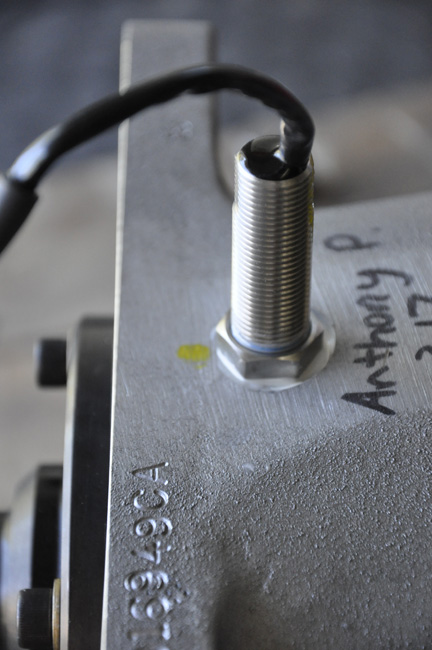
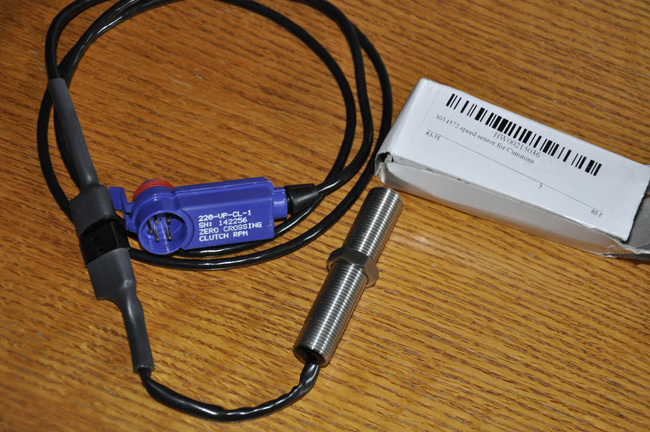
Greg at Motorsports Innovation helped get the sensor working since it was a non Racepak part. The Racepak sensor is a 3 wire sensor, whereas this one is just a 2 wire one. Fortunately it is mounted so close to the face, it clears the tunnel with about 1" of margin.
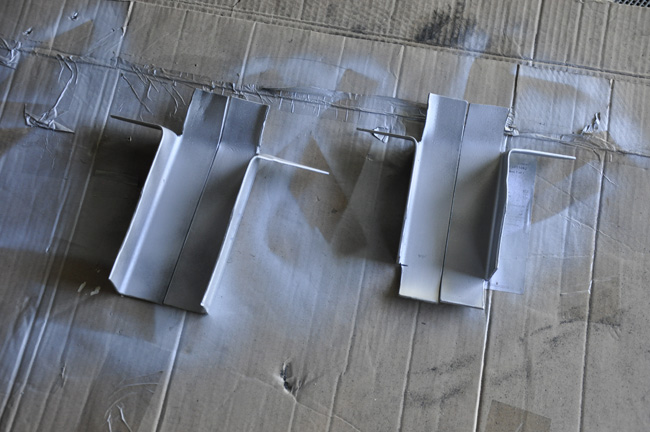
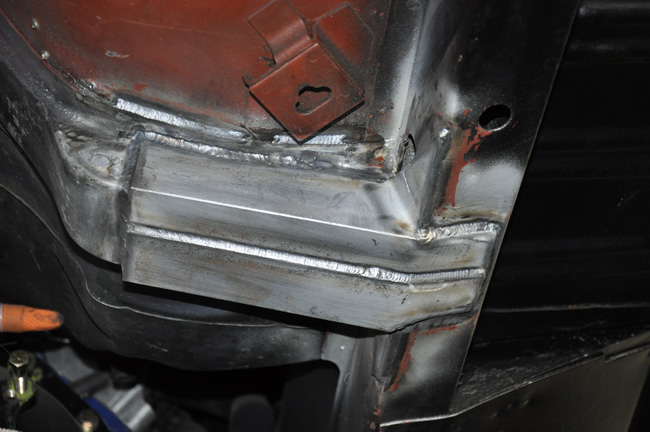
Now with getting this to all fit was a bit of a challenge. There were 3 main areas that were problems. The first was the tunnel area by the shifter to allow the shifter to even fit. I needed to open the area to the left side a good 1.5" to fit the shifter in. I was able to massage part of the tunnel with a body hammer, but the upper portion I needed to cut out and fab a new tunnel surround. The next was the tunnel support brace interfering with the 3-4 linkage. There was no way to get the needed space without cutting a portion of the left side out. Now the issue is structurally, to support the twisting of the transmission mounting. To make up for this, a 1/4" plate of steel was welded in the area that was removed, and perhaps overkill, I fabbed some braces out of chromoly to box in and stiffen up the lower mounting points. part of the reason I went with 2 piece supports was it was easier to fab, plus, it allowed me to put a weld down the center to attach these to the original brace, in addition to all around the edge.
Brace reinforcement:
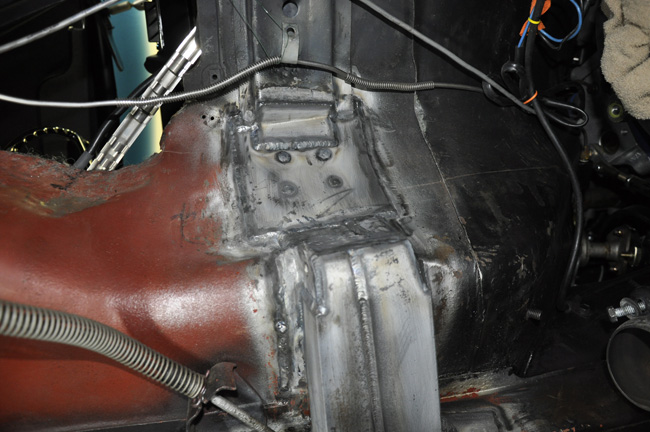
Mounting reinforcement:
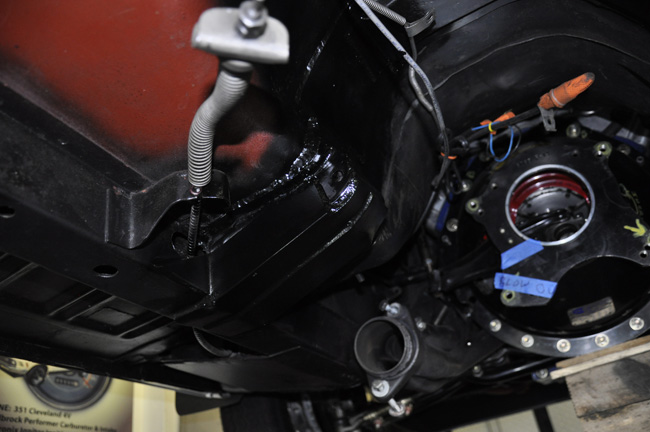
A little paint and it blends right in.
Now for the new tunnel:
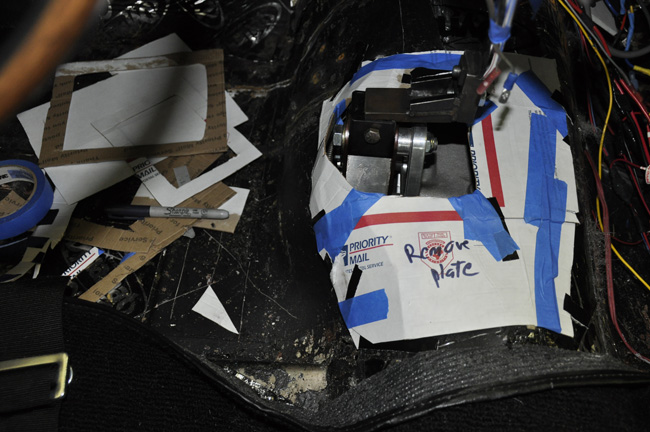
I initially mocked it up with cardboard then fabbed it out of 1 single piece
of 12ga steel using a body hammer to shape it. Wish I had an English wheel for
this.
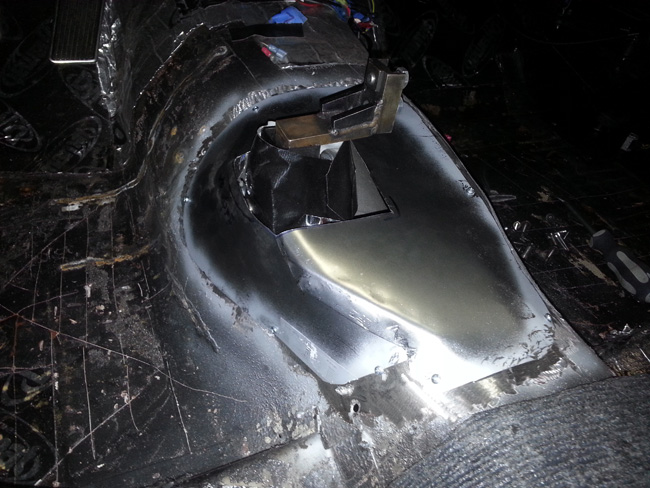
I initially used a few screws to hold it in place and then TIG welded everything which really stiffened up any flex.
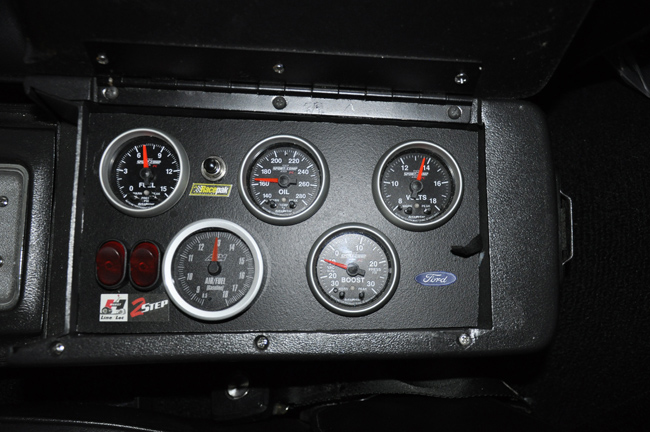
The last big issue with modifying the tunnel is that my OEM console will not fit as is. I had a number of the gauges and switches hidden in he console as show below, so now I needed a place to put the key ones, such as water Temp, Oil Pressure, and Oil Temp, my 2-step enable, and line loc enable (the engage switch is on the shifter). These, along with other stuff, such as vac, A/F are all monitored by the Racepak, so no need to see them.
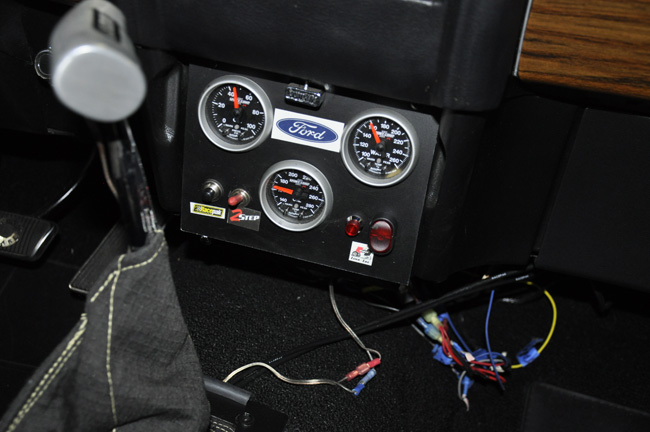
I will make the a final gauge placement a winter project, since there is only
4 more weeks left of the season here, but for now, here is what I ended up doing
in place of the radio which is not needed.
The end results: Because I did not want the tunnel to go more into the drivers side foot area, I had to be creative with the shifter boot and went with a flexible fire retardant one taht could wrap down the side, then made a custom bezel to hold it in place.

Took it out for a few short street drives after making sure everything worked on jack stands and it feels great. Need to do a bit more testing, so hoping to hit the track(New England Dragway) next Friday.
September 25, 2016- Final tweaks to clutch
Finished the rest of the adjustments including tweaking the pinion angle since the G101a tucks up higher than the TKO. Also with the linkage modifications I now have up to .080" air gap, with 0.35" TOB/fingers gap, so even better than my initial estimate.
I have not really gotten into it, but winding it out to 5500rpms feels great. Friday at the track will really be able to see what I have to do. Definitely much louder with gear whining due to the 7* back cut on the gears, but I like it. Also going from the TKO 2.87 1st gear to the G101a 3.19 gear feels great!
Current gear ratio is 3.70:1 with a Detroit Eaton Truetrac (I am pushing its limits now with 670HP), however, I am swapping the entire rear end over the winter to a stronger one with a 4.30 spool, which is part of the reason for the trans gear selection.
The 3.70 gives a SLR (Starting line ratio) with a 28" tire of 11.8 where as the 4.30 will be 13.7. Talking with GForce and others given the HP, weight, clutch and other factors, a SLR of about 14 is the target. Also the 4.30's will also help me trap the peak HP of 6800 RPMs
-------------------------------------------------------------