
|
Build Blog This page Last updated 12-9-2014 **** May take some time to load due to many pictures- Please wait***** |
Page 3
May 2, 2014: Custom 3" Exhaust Installed
The exhaust is all installed and it sounds great.
3" pipe from the headers to the tips and the exhaust shop (Mario's Custom Exhaust in Fitchburg, MA) did a great job. Took about 12 hours to complete.
Ball and socket flanges at the headers, as well as at the front of the mufflers. I wanted the ability to remove that section of pipe for better access to the transmission. So now I can remove 8 bolts and drop the complete center section.
We tried to install an X-pipe, however, with the transmission x-member and driveshaft loop, it would have hung down too low, so we went with an H-pipe.
Here are a few pictures and also a video of how it sounds:
The modified tips came out great and fit very well.


There really is lots of room between the driveshaft and those flanges. Just
the angle makes them look close.


And here is a video of how it sounds. Sounds great Now off to more work on the car.
May 15, 2014: Wrapping up some details
Been wrapping up some of the final details including the gauges and having some fun getting a few miles on the car.
Took a while but I had decided on the AEM wideband gauge, and eventually went with the 30-5130 analog one. Only open item gauge related is data logging module.
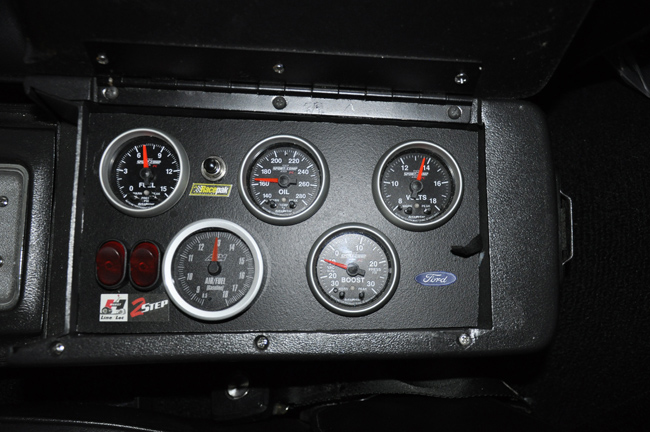
(The AF is not at 16, I just turned the ignition on without it running and that is where the needle was)
Also wanted to keep my hood tach, so I opted for an Autometer 5350 Pro level 3 Shift light with the integral digital tach. This allows playback along with much better accuracy than my Dixco With the hood tach, I did need to splice in a MSD tach module for it to work with my MSD Digital 6AL box
 The shift light can be easily
removed with one bolt, and pulling out the plug form the a-pillar, however, I
am getting used to it being there. A recessed mini-sub D connector female connector
is mounted into the a-pillar and the male on the light cable. There is just a
small hole in the plastic trim to access the connector. For mounting the light
I made a small mounting bracket that bolted to the a-pillar frame and slid through
a small cut in the plastic trim. The Autometer mounting bracket was modified since
the base was molded to mount on a curved surface and I needed it attached to my
fabbed a-pillar one using a single Allen screw. It also allows for pivoting so
I can clean the glass behind it.
The shift light can be easily
removed with one bolt, and pulling out the plug form the a-pillar, however, I
am getting used to it being there. A recessed mini-sub D connector female connector
is mounted into the a-pillar and the male on the light cable. There is just a
small hole in the plastic trim to access the connector. For mounting the light
I made a small mounting bracket that bolted to the a-pillar frame and slid through
a small cut in the plastic trim. The Autometer mounting bracket was modified since
the base was molded to mount on a curved surface and I needed it attached to my
fabbed a-pillar one using a single Allen screw. It also allows for pivoting so
I can clean the glass behind it.

May 27, 2014: Driveline Tweaks
Doing a little tweaking here and there as I am enjoying the car. I had a very very slight vibration at 82 mph (Drive shaft rotation of 3950 rpms) where you could barely feel it, but the mirror would shake.
The driveline was already pretty close with the U-joint working angles about 1 degree, however, there was a 1.7 degree difference between the trans tail shaft and the pinion yoke being parallel. I tweaked my driveline by shifting the trans up another 1/4" and adding a 2 degree wedge under the axle perch. Now the trans and pinion are less than a degree difference and driveshaft is about 1 deg at both ends.
I know that is not much, but it did make a difference. Now seems completely smooth up to that speed.
With about 150 miles on the car, I am even finding that the TKO-600 is starting to shift easier.
![]()
June 19, 2014: Drag Tires and Wheels
I ended up going with M+H Racemaster 275/60 15 (28" tall) DOT tires. They have a 9.5" tread and a 10.9" section width. After using an Draglite 8" rim with 4.5" BS they fit great. There is a good 1"+ clearance everywhere, including at the rear sway bar.
The question will be, with the soft sidewalls (poly belt material) will they hook up like M+H told me. Only the Dragstrip will tell me :)


July 23, 2014: Things going well
The car has been a blast to drive and the power is obvious. I never built this car with gas mileage in mind, however, I have been keeping track of it out of curiosity. Even though I have a 5 speed, most of my driving so far has been 1st-4th, and about 25% of the 1st, 2nd, 3rd gear accelerations have been aggressive, so gas is pouring in through that 1/2" fuel line through that 950 CFM carb.
And the result is about 10mpg.
Not too bad for 550HP, considering the slightly modified 351C that I previously had, was in that same range, but now with MUCH MORE HP and Torque that never stops!!!
August 22, 2014: At New England Dragway
Well I finally made it to New England Dragway and was able to get in 8 runs, and on the last one I fried my clutch. So off to take that apart and see what I did. After that last run, my clutch was not grabbing until half way up, where as it is normally about 1.5" off the floor. The following morning after cooling it was grabbing back at 1.5", and for street driving was ok, but would not hold enough to break the tires loose if I got into it. It was a kevlar/kevlar clutch.
Also the left tire moved about .5" on the rim after the 8 passes, but never lost any air, and on that same wheel, I noticed that my strange screw in wheel studs were just ever so splayed, so more to replace. But it was all fun.
Best MPH was 117.17 at 12.138
Best ET was 12.067 at 116.65 mph
My front spoiler turned out to be a pain since it would trip the lights versus the tires so I had to back up a few times to make sure I was properly staged.
A few times I could feel the car break loose when hitting 2nd, and it was hard to tell, but now looking at the video on some of my launches the car jumped up off the line and at times out about 5 to 10 feet seemed to slightly break loose since I could see the nose drop even though I was still in first. I was launching between 2800 and 3400, and since this was the first time out, was dropping the rpms during the shifts to get a feel. I was shifting at 5600rpm.
For the runs in the video the setup was:
90/10 Calvert drag shocks with all of my front roller suspension.
No front sway bar.
Rear Caltracs (low profile, so only upper hole)- Ended up with 1/2 turn preload
on left side and 1/4 on right side and it always launched straight after that,
with only side movement during the burnout.
Calvert CR9 Rear drag shocks set to #7
Calvert Split Mono-leafs with DelAlum shackles
Rear Drag Radial pressure was 18lbs- That gave me the best contact patch from
previous tests, also lined up with M+H tech support suggestions
According to the scale at the track, the car weighed 3490lbs. I did have a 90% full tank of gas not knowing how much I would go through.
Below is a video of 4 runs. The previous 3, were just getting a feel for the car, and of course the last one with my clutch, a Mack truck could have beat me
At the end I included a slow motion of the launches to get a better view of what was going on.
At the Track Video
September 4, 2014: NEW Drag Tires and Clutch
I was having a very hard time getting the M+H drag radials to hook up at the track and the best I was able to get in the 1/4 was 12.06sec. You could see the wheels break loose about 10 feet off the line, and again when I hit second forcing me to pedal it. Trying to launch with the drag radials and keep them hooked was not easy, and in the end I cooked my clutch. Initially I got the radials with plans of driving the car to the track and making it a better ride, and in the end used a trailer. So, I decided to break down and buy bias tires all around to replace the radials, along with a new clutch.
To still keep the car street friendly and not jump to the next level of an adjustable or slipper clutch (at least for now), I went with a less street friendly Centerforce DFX clutch, that is still streetable with some low RPM chatter, but grabs and holds great. This clutch set along with the scattershield and flywheel are all SFI 6.1 certified, so am also a bit safer.

The correct SFI 6.1 scattershield was backordered when I first started the build, and since became available, so that was also upgraded now that I had the transmission yanked. This scattershield like the previous Quicktime (non sfi) were right on when I dialed them in, so no offset dowels were needed.. The next thing I am going to do, is make a small heat shield to insulate the clutch slave from the headers.

For the Rubber on the front I went with Mickey Thompson Sportsman Front Runners, 26 x 7.5-15 with a 6.3" section width and a 4.8" tread width, mounted on a 15 in. x 4 in. with a 1.75 in. backspace wheel. In the back I used Hoosier Quick Time Pro, 28 x 11.5-15, with a 11.2" section width and a nice wide 10" tread. Needed to do some minor modification to the front inner wheel well to get good clearance, otherwise it fit well with the 8" rims with a 4.5" backspace.


Fills the wheel well very nice and enough room all around to slide your hand in. Talking with Hoosier, at 130mph the growth should be no more than 4” of circumference growth, and less than 1/4" width. That does exclude the bulging at the bottom during launch. Keep in mind that I am starting off with no tubes hoping that the softer side wall will help me with the manual trans launches. If a stiffer side wall is needed I will add tubes.
Now I just need to hit the track again and and see if things are improved. Then I can figure out any other things to do over the winter, which I already have a list started, that includes a cage.
September 27, 2014: Back at the Dragway
Hit New England Dragway last night for a few more passed down the track. I was much more pleased than the last time with more consistency and the best run at 11.67sec at 121.67mph and my best 60' dropped by a good .2 sec to 1.6.

Changes from the last time:
- New Centerforce DFX clutch. Great strip clutch, but chatters your teeth on
the street. Basically an on/off switch.
- Hoosier Quick Time Pro tires (bias DOT slicks) versus the drag radials.
- Mickey Thompson Sportsman Front Runners
- Set the Caltracs with 1/4 preload with the car fully loaded (same as before)
- Set the Calvert rear shocks slightly softer than before to 5.
- Found that launching at 3000 was the best last night. At 3500 would spin off
the line.
- Removed my shaker assembly and put a much larger (8"x15"x5"
tall) air filter. I found that over 4500rpm my AF was jumping around on the
more rich side. With the new filter it was just as stable as with no filter
at all. The shaker was definitely restrictive since it only has a 14"x2.5"
element in order to fit under the hood.
- The last time on the track, after 4 passes, my hydraulic clutch pedal started
feeling weird where it was grabbing differently. Hard to describe. I thought
that it was perhaps getting heated by the headers so I built a shield. This
time I experienced the same thing to a much lesser of a degree and wonder if
it is the DOT3 fluid heating up. I also switched to a high temperature racing
DOT3 after as well.


Ended up running about 15lbs pressure. When the track was warm, hooked up much better than before. You can see in the video that when I hit 2nd, it would break loose. Not sure if it was from the nose coming down causing loss of traction, or the loss of traction caused the nose to come down. After the sun went down, the fog rolled in making the track damp and I could not stay hooked in 2nd/3rd
For the exception of missing 3rd the first time out, all of my runs were within .2 sec, and 2 mph. Here is a vid. Someone commented on this launch that the tires got air, but can't see it in the vid due to the barriers.
At the Track Video
October 17, 2014: Problem with Shift Light
I have been having a weird problem for the past few months and finally solved it.
As part of my gauge setup, I have an Autometer Shift light (5350) that has a launch light feature that lights at a preset launch RPM, and then goes into a record mode. The launch feature gets deactivated by my line lock switch and then goes into normal shift light mode. Typical setup shown in the Autometer manual.
I have gone through two Autometer shift lights where they would work for a bit, then, after a short time, they could not be taken out of the launch mode which is done when the line-loc signal is toggled. The first light was assumed to be defective and replaced. Then the replacement one died. I spent quite a bit of time with Autometer tech support and they did an failure analysis on the 2nd one determining that an input resistor on the signal that is toggled was blown. I brought up the issue of the line-loc solenoid causing a spike when it is disengaged and the magnetic field collapses. They did say there is input protection on that signal for that reason, and they did have a similar problem many many years ago, but have not seen it recently.
Trying to get a better feel for what was going on and not damage a 3rd light I did some more digging and there is a HUGE spike generated by the line loc. I will not get into the details, however, it is due to the magnetic field collapsing and inducing a voltage (negative). Also talking with Hurst who made the line-loc there is nothing in the unit to suppress these types of spikes as is common with relays/solenoids.
Here is a scope snapshot showing the line-loc signal as it is engaged and released. Note the negative going spike that actual goes -60v when it is released.

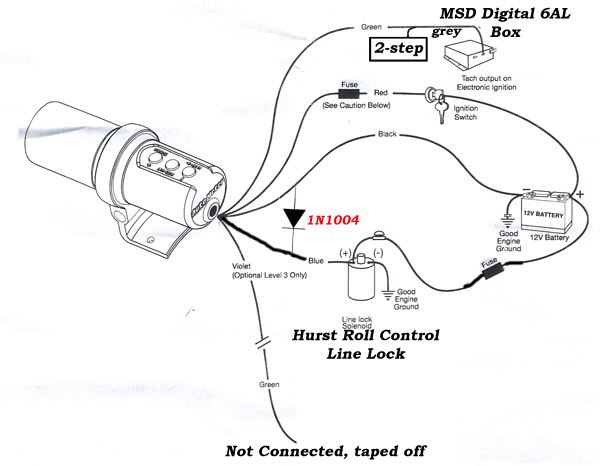
I decided not to chance damaging another light, and added a rectifier diode (1N1004, can get it at Radio Shack) across the line-loc enable signal to prevent this. This is a common approach used. There are a few solutions to solving this, such as switching a solid state relay to toggle the shift light line, but I chose this for simplicity.
Here is a scope shot with the diode in place. The spike is gone, and the light continues to work.

As a side note, it turns out that this is a problem with folks that use a transbrake, where the collapsing relay field can re-activate the transbrake for a moment.
Since my line-loc is tucked below the master I could not get to the wiring easily to put the diode directly across it, so after checking a few places with the scope, I found that I could best suppress the spike if I put it on the wiring at the shift light (about 4" from where it enters).
Here is a general diagram of how it is connected.
December 9, 2014: Modified Transmission and Shifter
Along with the transmission work that Hanlon did, I also swapped out the standard shifter to a Pro 5.0. I have been babying things with no aggressive shifting so the trans and clutch can break in, but there is a noticeable difference and firmer shifts. When in neutral there is less side to side slop (stiffer springs were installed), and when I go from 2nd to 3rd, I just push forward and it goes right into 3rd without having to guide the shifter.
The pro shifter is larger than the Slick Stick Shifter so does not fit through the stock tunnel opening. I had to open up the right side of the hole about 3/4" in a semi-circular pattern for it to slide up.
Since I have a console and want the shifter in a close to stock location, the shifter position was offset and moved back about 1" by welding on a tang on.


Note that for normal driving the Slik Stix shifter and internal stops are perfectly fine, however, I found that when shifting very hard, such as with drag racing, you beat the shift forks up, as well as the nylon fork pads. I wrecked those on my tko-600 with less than 1500 miles. I also put in bronze shift fork pads and the pro shifter with external stops helps to minimize that. I do realize that Tremec states that the internal stops are fine and you do not need external stops.
December 10, 2014: Modified Shifter Boot to Minimize Tearing
Torn shifter boots can be a problem with today's quality, and based upon the recommendations on the Boss 302 Registry site, I made a plastic insert for my boot this past summer for my Mach 1 and my 70 Boss 2 and they seem to be working good so I wanted to share it here.
They always seem to tear around the shifter.
I made the insert out of 3mm thick Sintra, a plastic material similar to Plexiglas, but more flexible and could be cut with an Xacto knife. I filed it out a bit and also slightly relieved the corners with a round file.

It fit in very tightly, however, I still used black rubber glue to hold it
in place.

Click here to go to the last Page